Tutorial: Link your GitLab project to PostHog and watch users interact with your Pages site
This website is hosted in a GitLab project. It’s a static website generated with Hugo and is deployed with GitLab Pages. You might have a similar setup, and are curious to find out how users are interacting with your site when they visit it.
You can use PostHog Session Replay to record what users are doing when they are on your site. And if you spot problems with your site while watching recordings, PostHog integrates with GitLab so you can open bugs directly in your GitLab project.
For example, you might notice that a user repeatedly selects a link that doesn’t do anything, and you want to create an issue for your team to investigate if the link is broken. Ordinarily, you’d have to sign into GitLab, find the correct project, open an issue, then return to PostHog to continue watching sessions. With an integration, you can avoid context-switching and focus on your task.
In this tutorial, you’ll connect your PostHog project to your GitLab project, add a snippet to your website code to enable session recording, watch a recording, and open an issue in GitLab from the PostHog user interface.
Before you begin
You must have:
- A website in a GitLab project that deploys with GitLab Pages. For an example, see Build, test, and deploy a Hugo website with GitLab in the GitLab documentation.
- A PostHog project. You don’t need anything set up in the project yet.
Create a GitLab access token
You must create a GitLab access token to enable PostHog to create GitLab work items for you.
If you’re on a paid subscription or using GitLab Self-Managed, you can create a project access token:
- In the top bar, select Search or go to and find your project.
- In the left sidebar, select Settings > Access tokens.
- Select Add new token.
- In Token name, enter a name.
- In Expiration date, enter an expiry date for the token.
- Select a role for the token.
- Select the
apiscope. - Select Create project access token.
If you’re on the Free tier and using GitLab.com, you can create a personal access token. For this tutorial, create a fine-grained token that only allows the ability to work with issues.
- In the upper-right corner, select your avatar.
- Select Edit profile.
- In the left sidebar, select Access > Personal access tokens.
- From the Generate token dropdown list, select Fine-grained token.
- Complete the Name and Description fields.
- In the Expiration date text box, enter an expiry date for the token, or leave the default.
- Select Only specific groups or projects that I’m a member of.
- In the Add group or project drop-down list, select your project.
- Under Add resource permissions:
- In the left panel, select Project Planning.
- In the right panel, next to Work Item, select all the available permissions.
- Select Generate token.
After you create the token, copy and paste it somewhere safe. You cannot view it again.
Now, get the project ID:
- In the top bar, select Search or go to and find your project.
- On the project overview page, in the upper-right corner, select Actions (three vertical dots).
- Select Copy project ID. Paste it somewhere safe.
Add the GitLab integration in PostHog
- Sign in to PostHog.
- In the left sidebar, select Session replay, then select Settings > Integrations.
- Under GitLab, select Connect project.
- Enter your GitLab server hostname, or leave the default if you’re on GitLab.com.
- Enter the project ID you copied earlier.
- Enter the access token you generated earlier.
- Select Connect.
Update your website code
Now you’re ready to add a small snippet of code to your website that sends data to PostHog.
-
In PostHog, in the left sidebar, select Settings > Project > General.
-
Under SDK setup, copy the HTML snippet. It contains your API key.
-
In GitLab, go to your project and find the base HTML page that contains the
<head>content for your website. For a Hugo site, this is usually thelayouts/_default/baseof.htmlfile. -
Paste the snippet. For Hugo, instead of pasting in the base file, you can add the snippet to a separate partial file to make it easier to manage in future, and to avoid cluttering your base file:
-
Paste the snippet in a new partial file at
layouts/partials/posthog.html. -
Call the partial by adding the following line to
baseof.html:{{- partial "posthog.html" . -}}
-
-
Commit and push your changes to your project, and wait for the pipeline to finish.
Enable session replay and watch a session
Before you can start watching sessions, you must enable session replay.
-
In PostHog, in the left sidebar, select Session replay and select Record user sessions.
-
To initiate a session yourself, go to your website URL, and click around to activate a recording.
-
After a minute or two, go back to Session replay. Your recording should be available and start playing automatically.
-
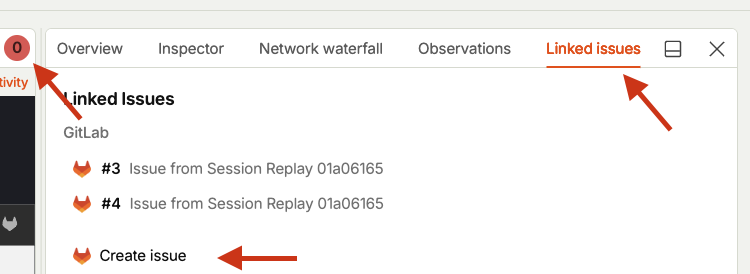
Now try creating an issue. In the overview section, select Create issue. If the button is not visible, you might have to expand the overview area first and go to Linked issues.
-
Provide a title and description, then select Submit.
-
Select the issue link to view the issue in GitLab.
That’s it! You’re now set up to capture user sessions on your website and log issues as soon as you find them.
Related topics
- Learn more about what you can do with Session Replay in PostHog.
- Configure recording rules to capture specific types of sessions.